How to Move WordPress to Phoenix LiveView with Mishka CMS
A step-by-step guide to the Mishka CMS Migration extension: connect WordPress over REST or an export file, run a dry run, settle the decisions, import, and keep every old URL with 301 redirects.

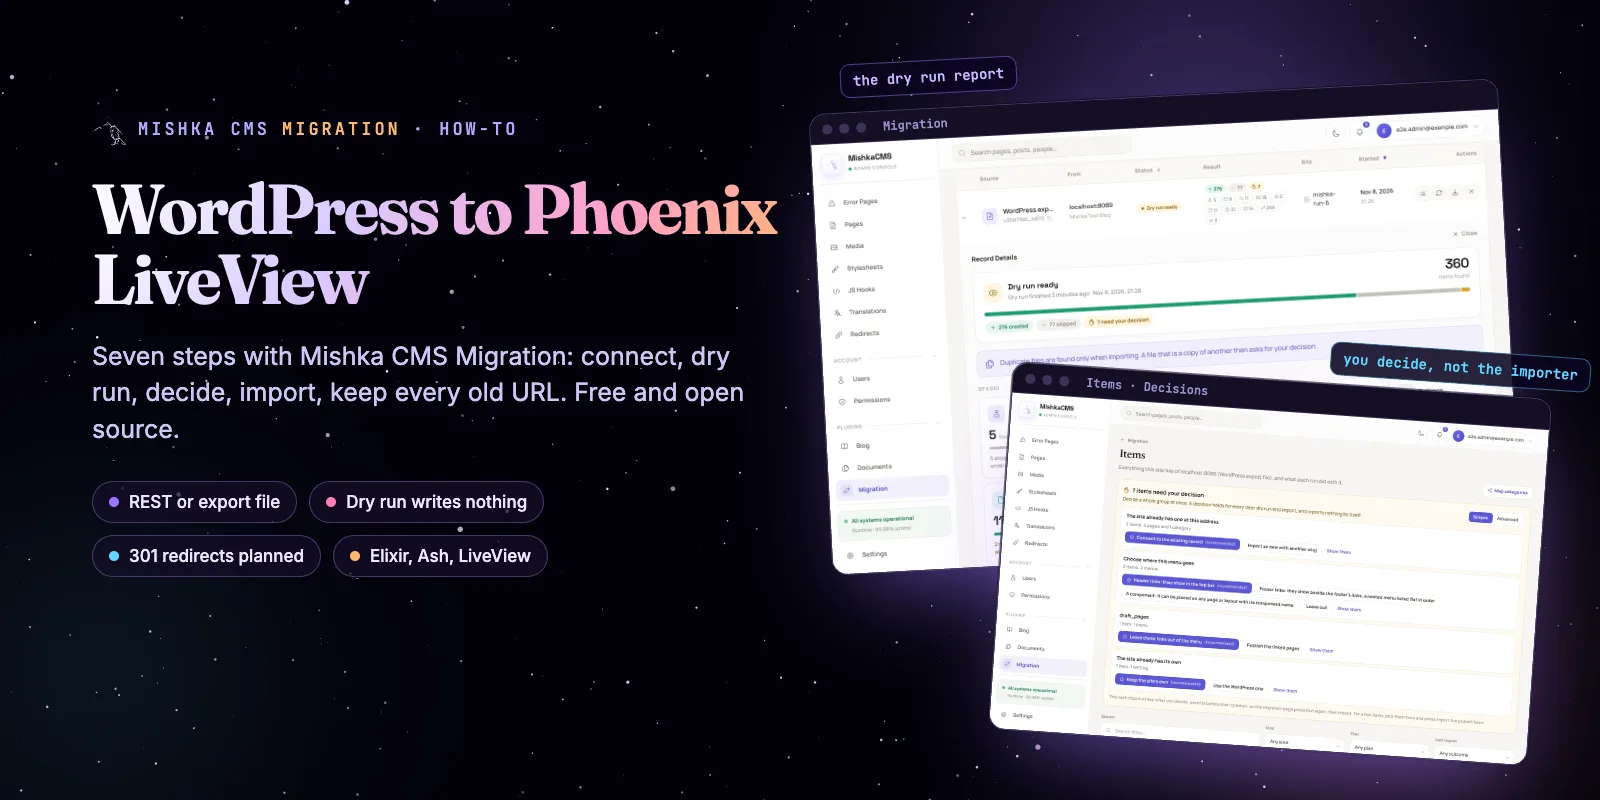
You can move a WordPress site into Mishka CMS from the admin, without writing a script. The Mishka CMS Migration extension reads your WordPress site, shows what it would create, asks you about every conflict, and imports only after you press the button. This post follows the real screens, step by step.
Mishka CMS stays free, and so does this extension. A founding seat pays for the time we spend on both, and it gives you lifetime access, priority support and every paid extension we release.
Here is what you get at the end: your posts, categories, tags, authors and comments in Mishka Blog, your pages, menus and media, and a 301 redirect for every old WordPress address that moved. The site runs on Elixir, Phoenix LiveView and Ash.
Read it top to bottom once, or jump to the step you are on. Each step ends with what you should see, so you know it worked.
Mishka CMS releases. Once a month.
New Mishka CMS releases, Elixir and Phoenix patterns, and case studies from the team. No spam, unsubscribe anytime.
The whole move on one page
A migration has seven steps, and the first five write nothing to your site. You install the extension, connect WordPress, choose what to bring, run a dry run, settle the decisions and only then import.
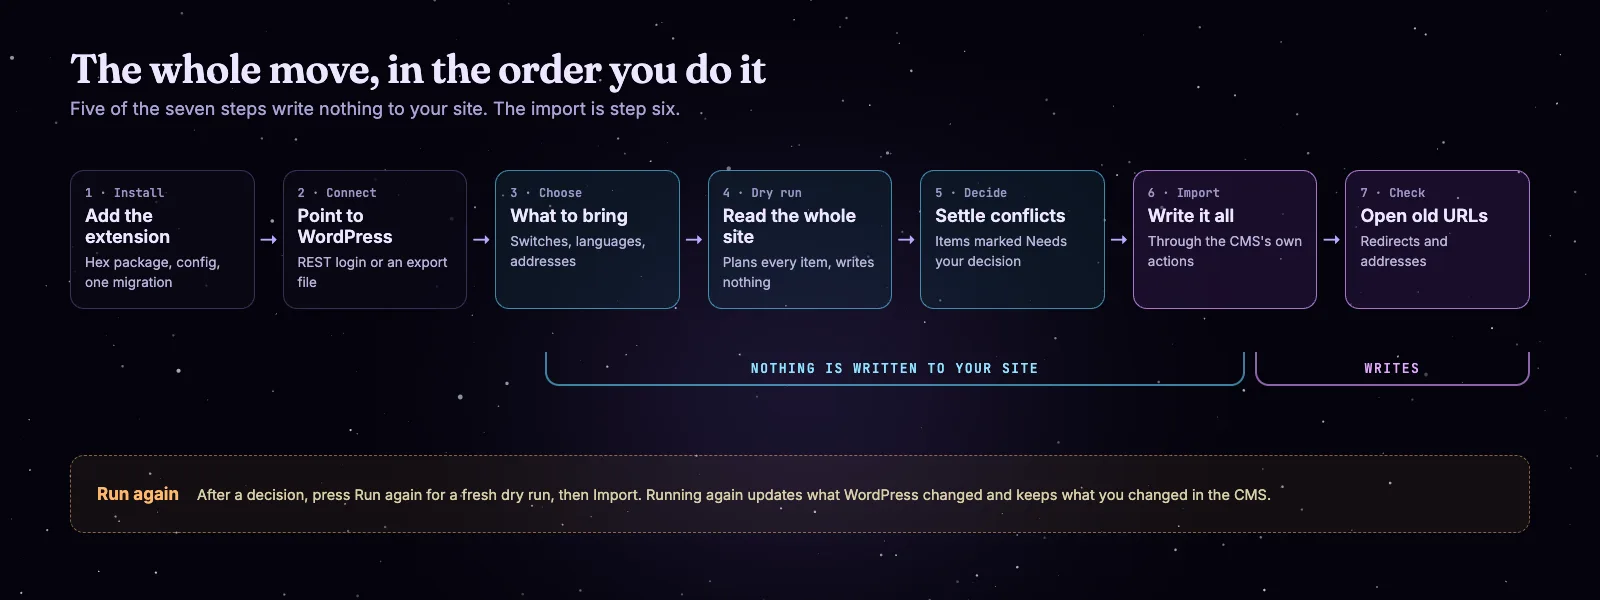
The whole move. Only the import writes to your site.
The flow in six frames, from New import to the decisions. Frames are real screens of the admin.
Before you start
You need a Mishka CMS site, an admin who may run imports, and one way to read WordPress. Check this list first and the rest goes fast.
admin:dashboard:migration, plus the permission of each kind the import writes.Step 1. Install the extension
Mishka CMS Migration is an Elixir package, so you add it to your host, register it and run one migration. A project cloned from the Mishka CMS repository may already list it. The guide Install the migration extension has the full version.
1. Add the package to mix.exs:
# mix.exs
defp deps do
  [
    # ...your other deps
    {:mishka_cms_migration, "~> 0.0.3"}
  ]
end
2. Register it. Add the Ash domain to your domains and the web module to the core's extensions, and give Oban a migration queue with one worker:
# config/config.exs (keep the entries you already have)
config :mishka_cms,
  ash_domains: [MishkaCmsMigration, MishkaBlog, MishkaCmsCore.Runtime, MishkaCmsCore.Accounts]

config :mishka_cms_core,
  extensions: [MishkaCmsCoreWeb, MishkaBlogWeb, MishkaCmsMigrationWeb]

# The dry run and the import are jobs on this queue, one at a time
config :mishka_cms, Oban,
  queues: [migration: 1]
3. Create the tables for the runs, items and log:
mix deps.get
mix ash.codegen add_cms_migration
mix ash.migrate
4. Set it up on a site from the CMS installer, as Install an extension shows. Then give the admin who will import the admin:dashboard:migration permission.
Step 2. Connect WordPress
Pick the REST source for a live site, or the export file for a site with translations. Both end in the same dry run. Press New import on the card you want.
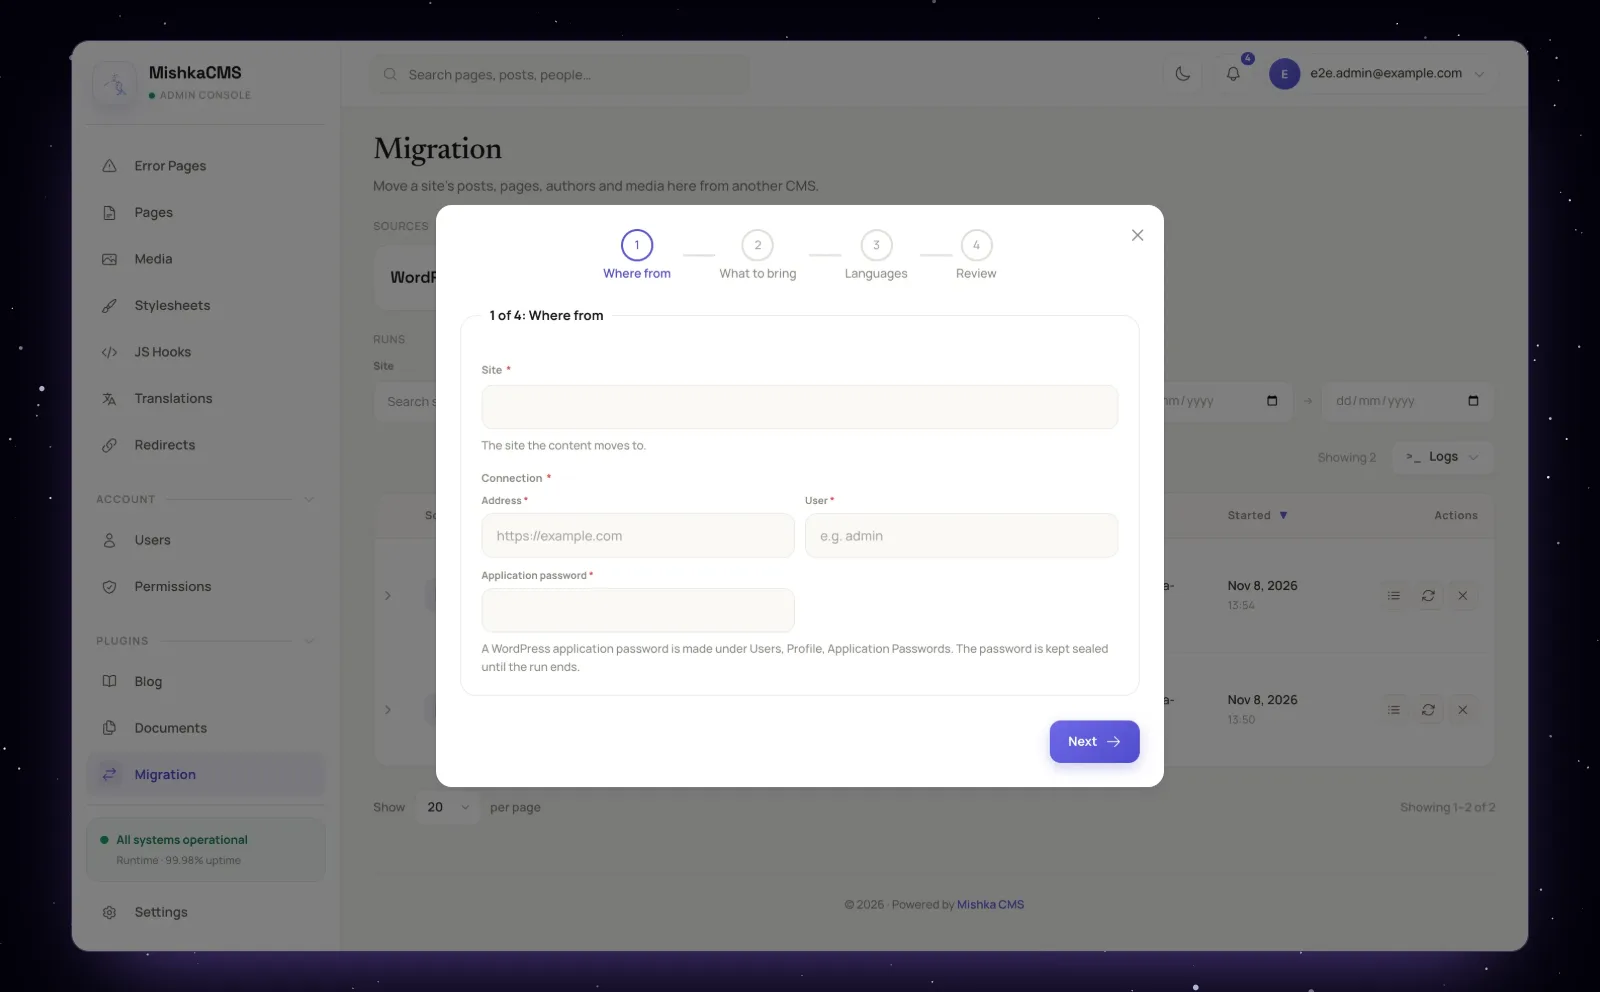
Step 1 of the window: where the content comes from.
For the REST source, make the application password in WordPress under Users, Profile, Application Passwords. Then fill in the three fields. The user is the WordPress user the password belongs to, such as admin.
When you press Next, the window tries the connection before it moves on. It reads /wp-json/ first and then signs in at /wp-json/wp/v2/users/me?context=edit, so the reason it gives is the first thing that is wrong. You can run the same check yourself:
# Does WordPress answer, and does the application password sign in?
curl -s -u "admin:xxxx xxxx xxxx xxxx xxxx xxxx" \
"https://example.com/wp-json/wp/v2/users/me?context=edit"Step 3. Choose what to bring
Step 2 of the window is a list of switches, and every one is on except Comments. Switch off what you do not want. Something you switch off is listed as Left out by you, and you can bring it back later on the Items page.
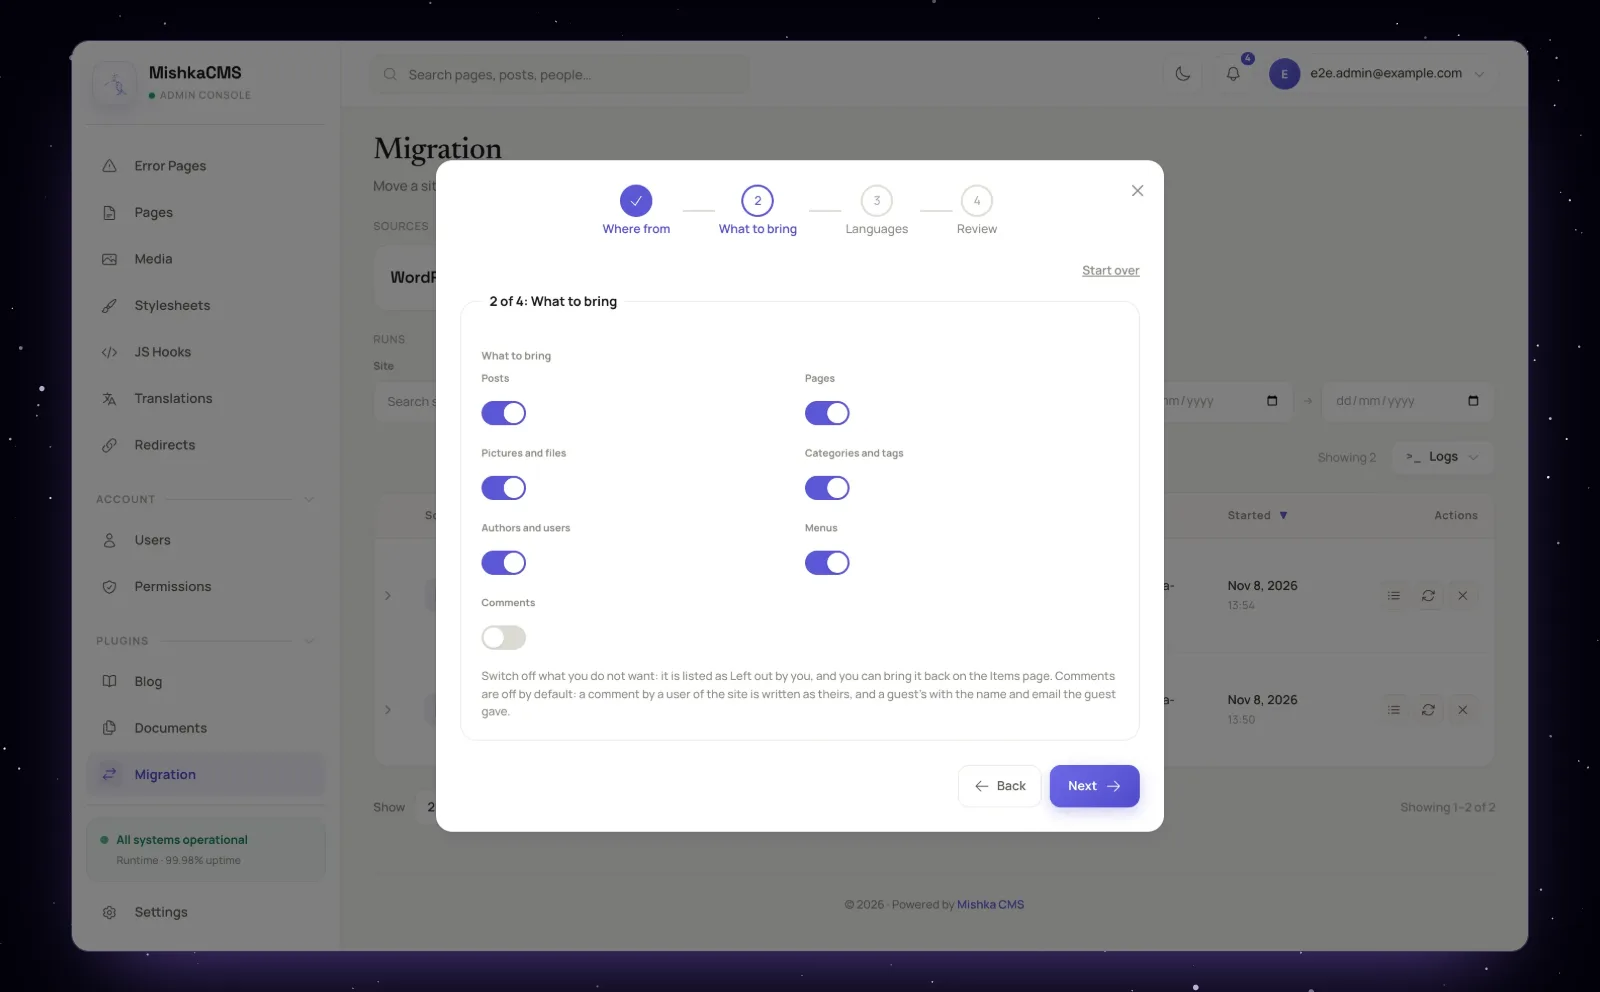
Step 2: switch off what you do not want to move.
| Switch | Default | Moves |
|---|---|---|
| Posts | On | Posts, into Mishka Blog |
| Pages | On | Pages, as drafts unless you choose otherwise |
| Pictures and files | On | Files, downloaded into the Media library |
| Categories and tags | On | Categories and tags, into Mishka Blog |
| Authors and users | On | Authors, as Blog bloggers tied to your users |
| Menus | On | The site's menus |
| Comments | Off | Comments, into Mishka Blog |
Step 3 asks about languages. Leave it empty to keep the languages WordPress gives. Pick one to put everything that has no language of your site's into it. The list comes from Settings, Languages, so add a language there first. On a Polylang or WPML site, also set the site's language addresses before you import, as Set a site's languages explains.
Step 4. Choose the addresses and start the dry run
The Review step says in words what the run will do, and its Advanced options hold the choice that matters most for SEO: Post addresses. The default keeps your WordPress addresses, so a post stays at /2025/12/hello/.
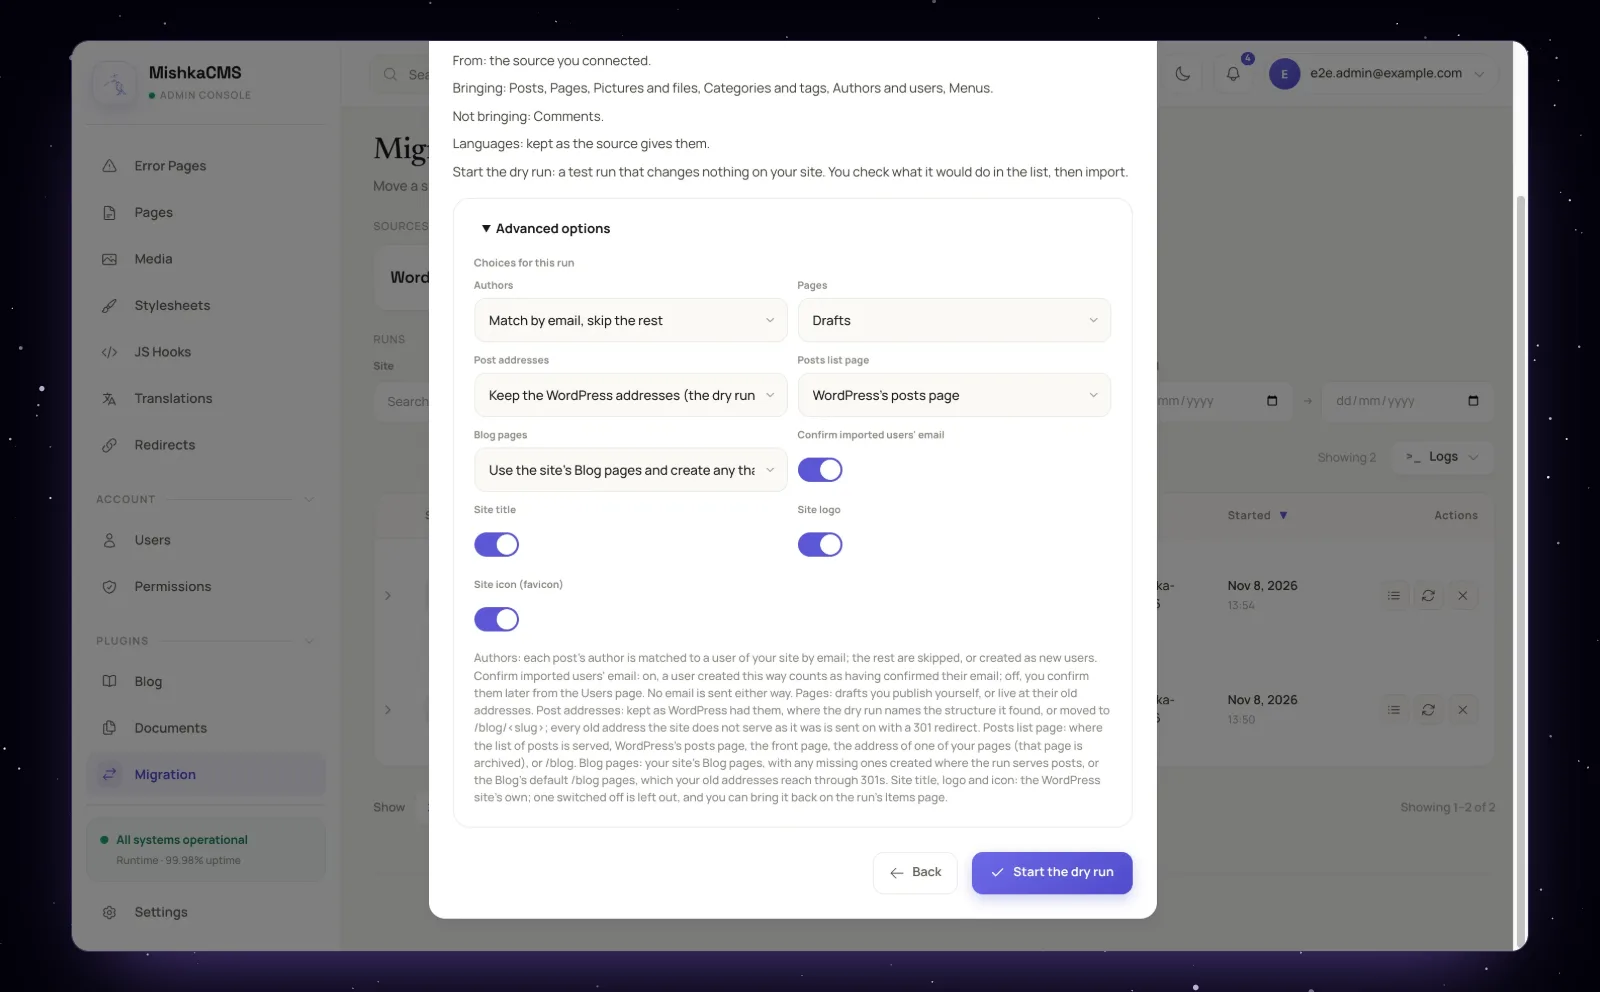
Step 4, Review: Advanced options hold the Post addresses choice.
/blog/<slug> with 301sPosts move under /blog and every old address is redirected./blog/<slug>, no redirectsPosts move under /blog and old addresses are not redirected.The other choices stay at their defaults for a first run. Run options lists every one. Press Start the dry run. The run connects first, then saves itself and starts the dry run, which writes nothing to your site.
Step 5. Read the report
A dry run reports what an import would create, update and skip. Open the run's details with the arrow at the start of its row. The head shows how many items it found and a bar of what came of them.
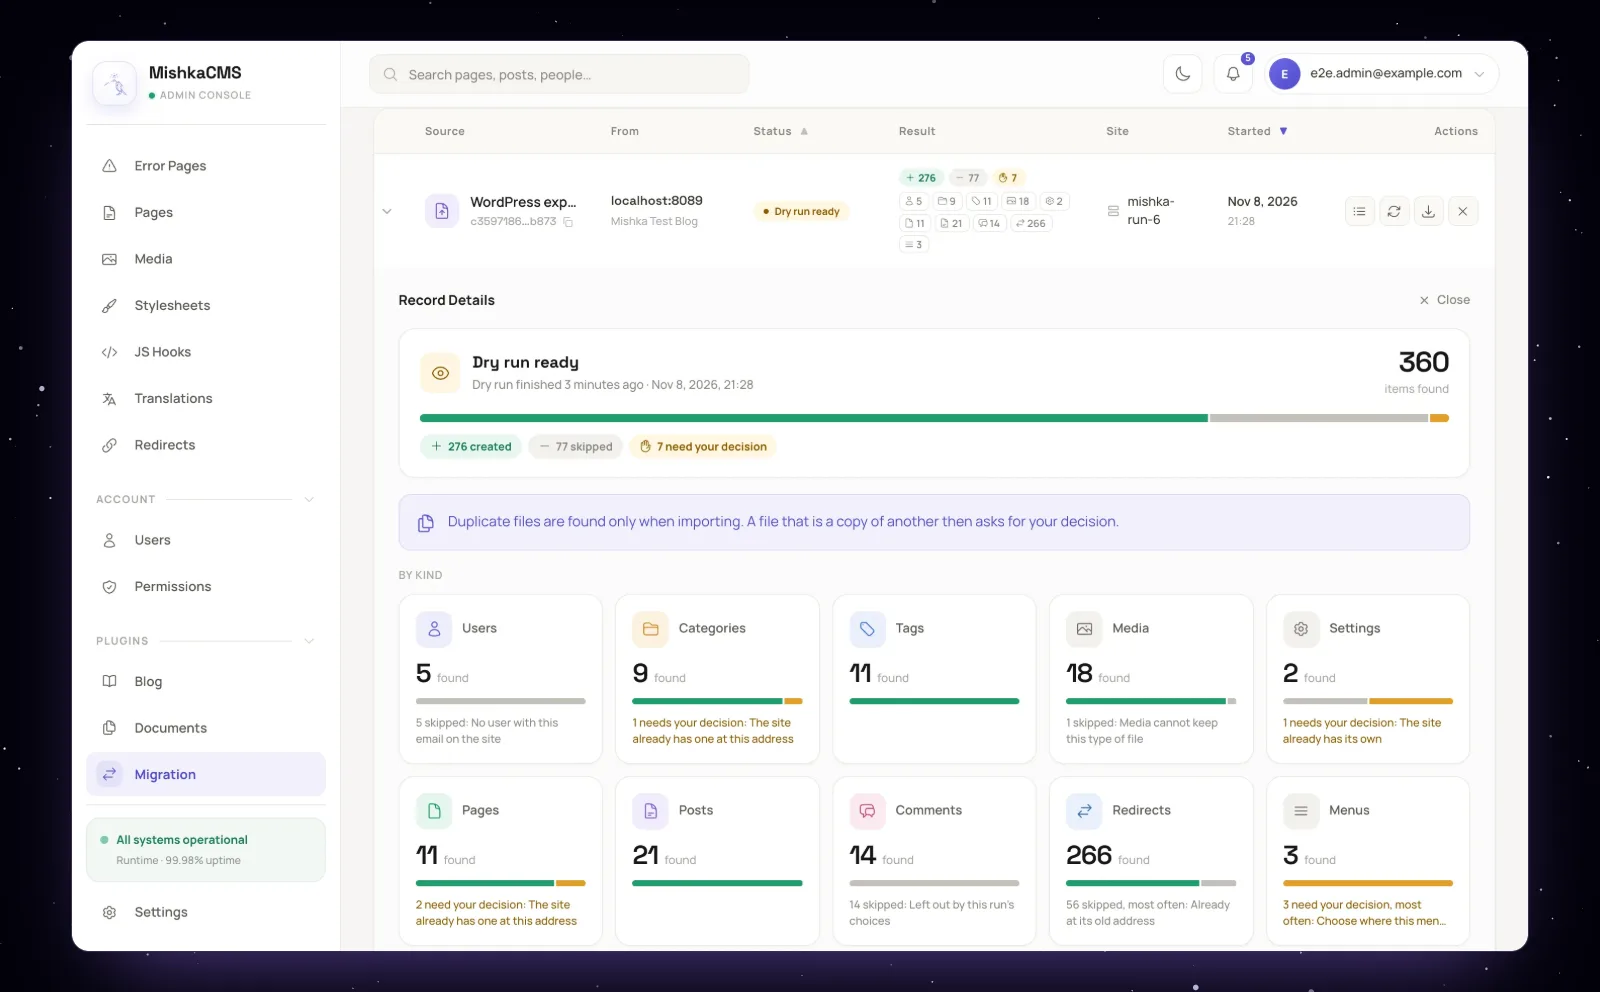
The report of a dry run. Nothing is written yet.
Our test export gave 360 items: 276 would be created, 77 skipped and 7 need your decision. Most of the 360 are redirects, one for each old address the run found.
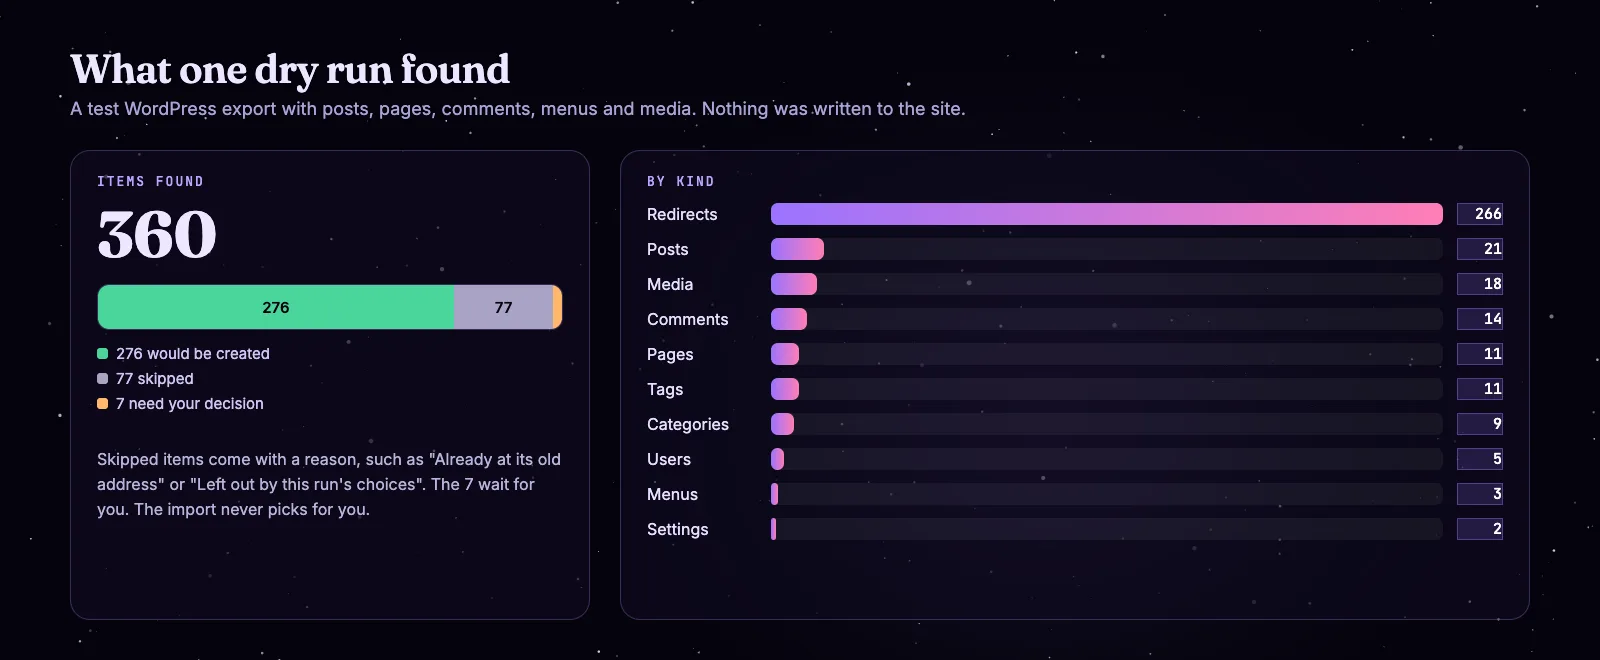
What one dry run of a test export found.
Read three things before you go on:
- The cards. There is one per kind, with a bar and the reason most skipped items give.
- The warnings. A banner such as Imported links may not match the site's language addresses says what to fix first.
- About the source. It names the post addresses the run found, and how many posts sit outside that shape.
No decisions waiting and no failure you care about? Press Import. Otherwise go to the next step. The guide Read a dry run explains every part of the report.
Step 6. Settle what needs your decision
The importer never picks for you when two answers are both reasonable. It marks the item Needs your decision and waits. Press the Items icon on the run's row, and the Decisions panel sits above the table.
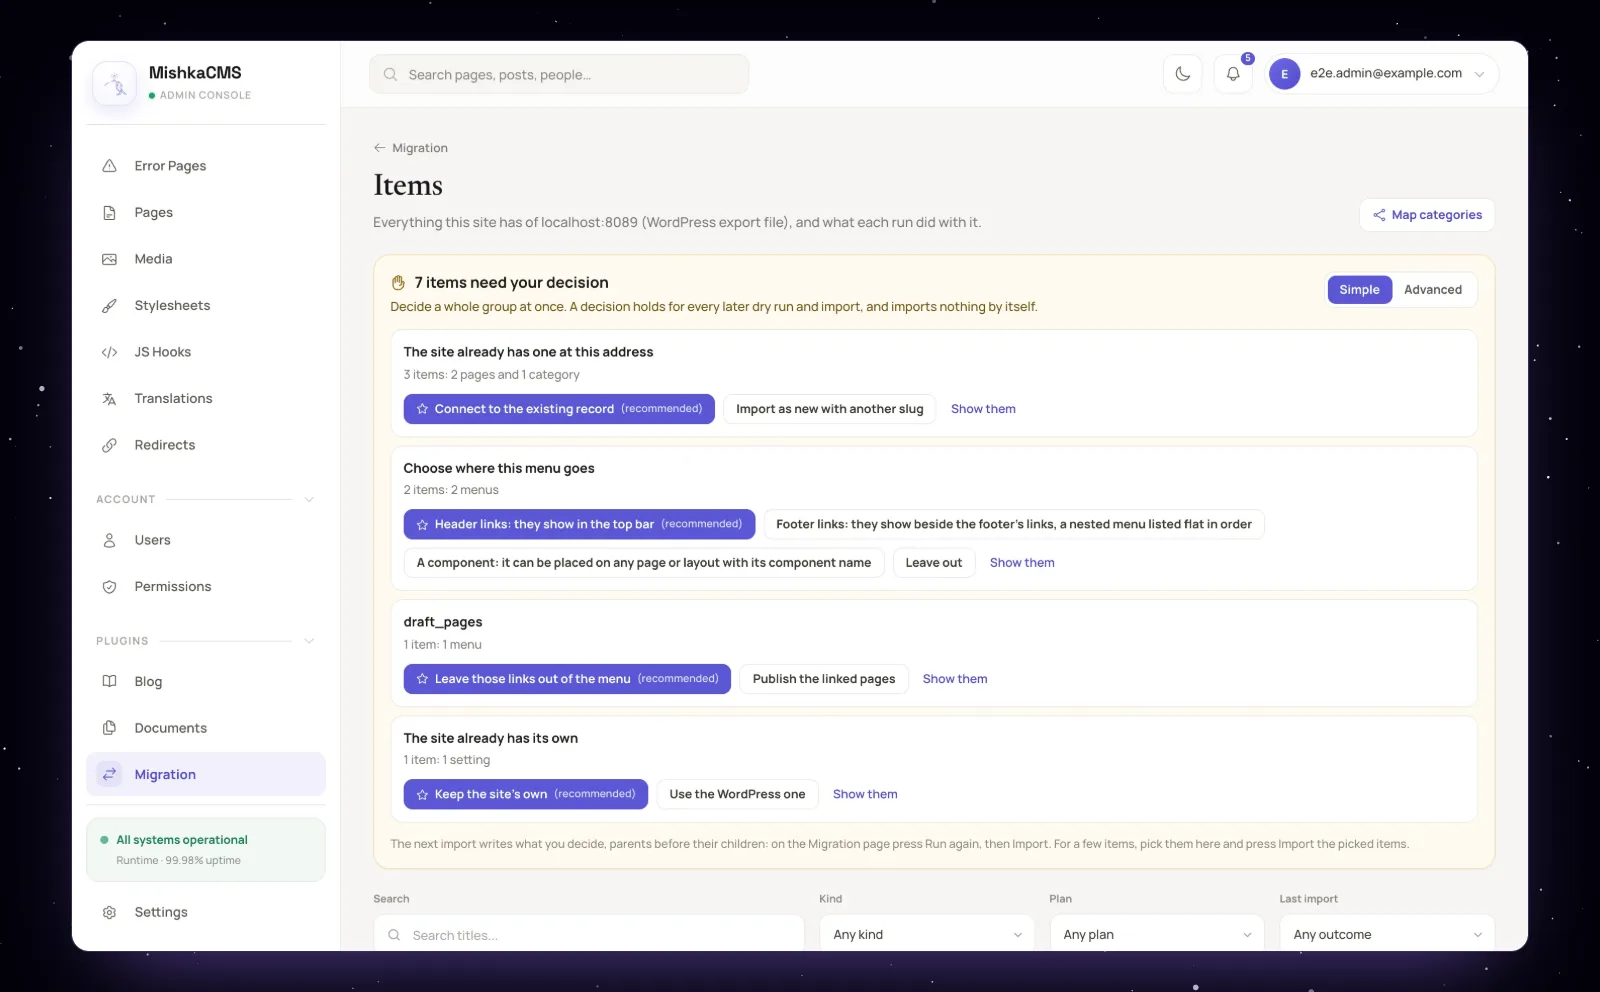
The Decisions panel: one card per conflict, the recommended choice first.
Read a card. Each names one conflict, says how many items wait, and lists the choices. The recommended one comes first, with a star.
Look first if you want. Press Show them to narrow the table to the items that wait.
Press a choice. The page asks to answer N items with it. Confirm, and the whole group is decided at once.
Run again, then Import. A decision only records your answer. The next dry run follows it, and the import writes it.
These are the conflicts you will meet most often:
| The item says | Choices |
|---|---|
| The site already has one at this address | Connect to the existing record, or import as new with another slug |
| Choose where this menu goes | Header links, Footer links, A component, or Leave out |
| Contains scripts or inline event handlers | Remove them, or keep them if you trust this content |
| A page of the site is at this post's address | Import with another slug, or Leave out |
| Same file as another | Keep both, or use the original |
| The source does not say its language | Import it in the site's main language, or wait for the export file |
A decision belongs to the item, not to the run, so it holds for every later dry run and import. Advanced mode lets you decide by rule: one choice per kind and conflict, a preview of how many items each rule decides, and one Apply. For single items, see Work on single items.
Step 7. Import, then open your old addresses
Press Run again, then Import and confirm. The import writes each item through the CMS's own actions, as the admin who pressed the button, parents before their children. The CMS's permissions and validations decide what it accepts. When it ends, the status reads Imported.
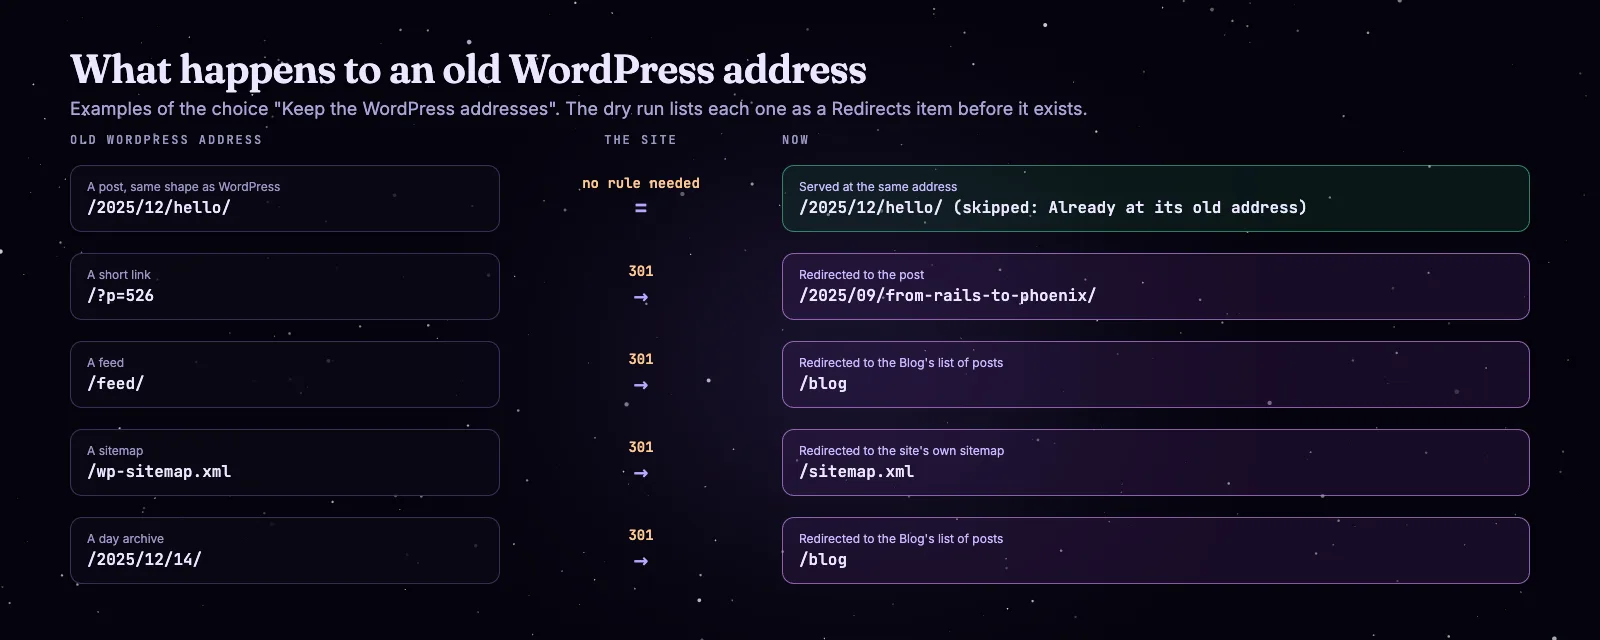
Old addresses become redirect items. The dry run lists them first.
Now check the redirects. The run's details say how many rules it wrote under Redirects written, and the Redirects page in the admin lists each one. Then open an old address, as a visitor would. This is a real answer from a local test site that was filled by an earlier run:
curl -sI 'http://localhost:4030/?p=526' | grep -i "^HTTP\|^location"HTTP/1.1 301 Moved Permanently
location: /blog/from-rails-to-phoenix-a-year-of-honest-notes-2Open three old posts at their WordPress address. Each answers there, or redirects with a 301.
Open a short link such as /?p=526, a feed and a category. See Redirect an old address to manage the rules.
Publish your pages. They come in as drafts unless you chose Live at their old addresses.
Tell your users. If the import created users, their WordPress passwords cannot come along. They sign in with Forgot password or a social sign-in.
Running it again is safe
Run again updates what WordPress changed and keeps what you changed in the CMS. The extension remembers every item by site, host, kind and source id, and that memory is what makes a second run safe.
One site can also take content from several sources, such as two WordPress blogs. Each run keeps its own items, and the same id on two hosts is two items. The page How a migration works explains the memory, and what happens to the application password: it is sealed with the CMS's secret key and kept until you cancel the run.
What to expect
Most sites move cleanly, and a few things need a human. These are the ones we know about, so none of them surprises you:
- A post that is pending, private, password protected or scheduled at the source comes in as a draft, and its item says why.
- A file on another host, such as a CDN, is skipped and stays where it is.
- A page built with Elementor widgets that Mishka CMS has no match for waits for your decision.
- Only WordPress is supported today. Joomla, Drupal and Ghost are planned.
Where to go next
You now have your content and your old addresses in Mishka CMS. Here is what to read next:
- Mishka CMS Migration docs, with the reference for every option, status and permission.
- Mishka CMS 0.0.2, for the visual editor you will use on your imported pages.
- How we built Mishka CMS, the story of the runtime behind it.
- Mishka Blog, where your posts now live.
If you want us to run the move for you, hire us. You can also back the project through the sponsor page, or take the founding seat below. The package is on Hex and the code is on GitHub.
Mishka CMS releases. Once a month.
New Mishka CMS releases, Elixir and Phoenix patterns, and case studies from the team. No spam, unsubscribe anytime.
Questions people ask about moving WordPress to Mishka CMS
Thank you
Mishka CMS Migration stands on Elixir, Phoenix LiveView and Ash Framework, and on WordPress, whose open REST API and export format make a move like this possible. Thank you to everyone who builds them, and to you for reading this far.
Shahryar Tavakkoli writes about Elixir and Phoenix LiveView: Mishka Chelekom releases, GuardedStruct validation, static sites, service workers and SEO.